An air switch for a garbage disposal is a smart and safe alternative to the clunky wall switch you’re probably used to. It's designed specifically for the wet environment around a kitchen sink, using a simple puff of air—not electricity—to turn your disposal on and off. This clever design completely eliminates the risk of electrical shock when you have wet hands, making it a fantastic upgrade for both safety and style.
What Is an Air Switch and How Does It Work?
Ever blown through a straw to make a wrapper fly? An air switch works on a similar, but much more refined, principle. Instead of an electrical signal traveling from a switch to your disposal, it sends a quick pulse of air. It’s a brilliantly simple concept that uses air pressure to keep high-voltage electricity safely tucked away from water.
The whole system is made up of three main parts that work together seamlessly.
The Button and Air Tube
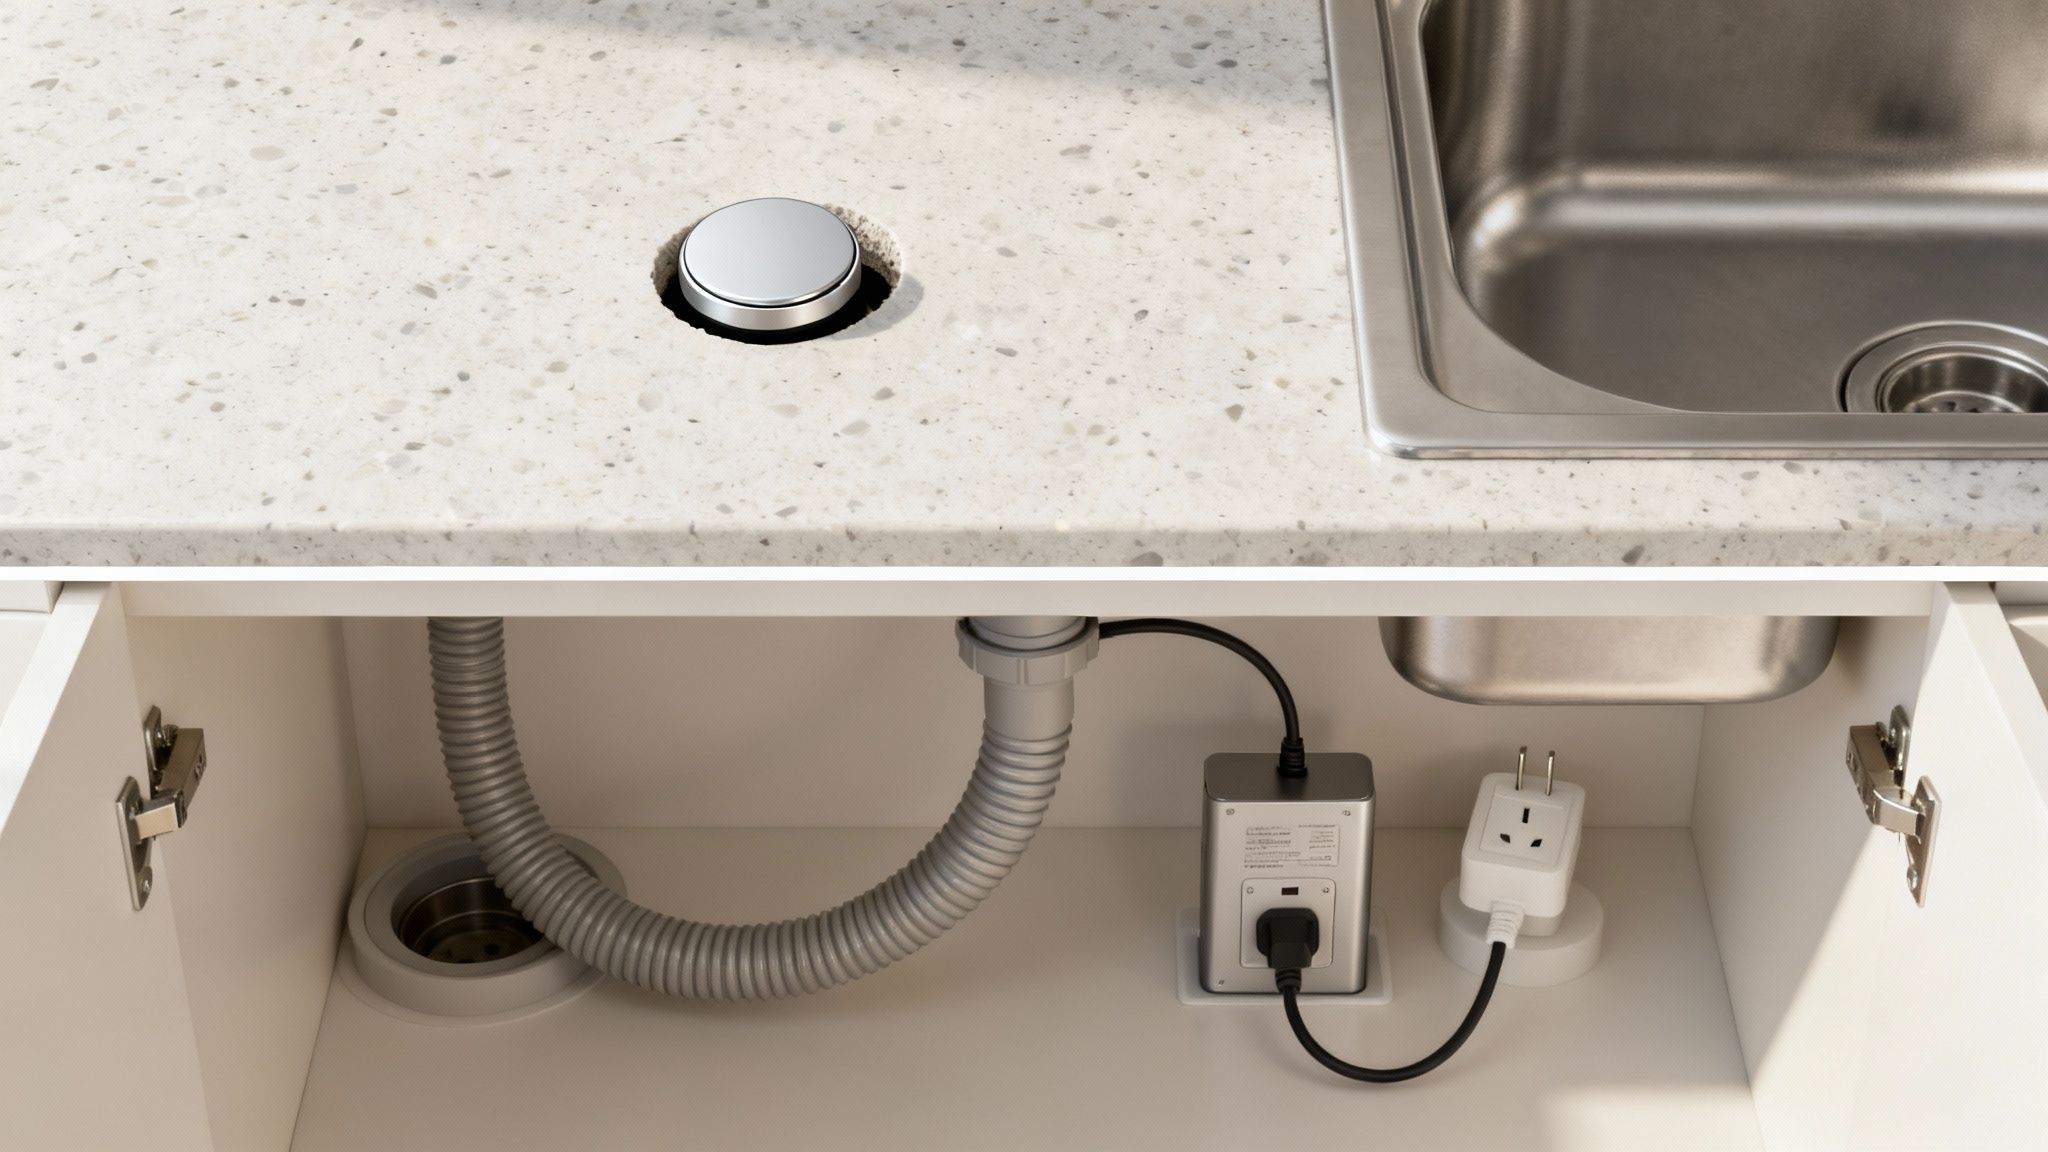
The only part you'll see is the push-button, which sits right on your countertop or sink deck. It’s a clean, low-profile button available in tons of finishes to perfectly match your faucet and other fixtures. When you press down on it, it acts like a tiny plunger, forcing a small burst of air through a thin, flexible tube hidden under the sink.
The key thing to remember is that this button has zero electrical wiring running to it. It’s purely a mechanical device, making it 100% safe to press even when your hands are dripping wet.
The Power Control Unit
That little air tube snakes its way down to a small power control box. This is the heart of the system. This box plugs into a standard GFCI electrical outlet under your sink, and then your garbage disposal plugs right into the box itself. Inside, there's a diaphragm that's sensitive to changes in air pressure.
When the puff of air travels down the tube and hits that diaphragm, it flexes and flips an internal electrical switch, sending power to the disposal and turning it on. Press the button again, and another puff of air tells the switch to turn the power back off. It's that simple.
The real genius of the air switch is how it completely isolates you from the electrical current. By using air as the "messenger," it creates a physical gap that electricity can't jump across, making it an incredibly safe option for kitchen islands and sinks.
This simple yet effective design is quickly becoming the new standard. In fact, the global market for garbage disposal air switches hit USD 562 million in 2024, largely because people are looking for safer, more convenient kitchen setups. With so many homes having garbage disposals, it just makes sense to pair them with a switch that removes the shock hazard that comes with traditional wall switches. You can explore more about these market trends and safety statistics to see why this technology is popping up in modern kitchens everywhere.
Comparing Your Garbage Disposal Switch Options
Picking the right switch for your garbage disposal is about more than just turning it on and off. You've got to think about safety, how it looks in your kitchen, and what the installation really involves. The classic wall switch is what most of us are used to, but putting it right next to a sink full of water has always been a bit of an electrical gamble.
This is exactly where the air switch for garbage disposal comes in as a much smarter, safer alternative. It gives you a sleek button right on your countertop, but all the electrical action happens safely under the sink, far away from any water. It’s a simple change that brings a lot of peace of mind.
To help you decide, let's break down the most common options you'll encounter.
Garbage Disposal Switch Comparison
Here's a quick side-by-side look at the main contenders to help you see how they stack up in the areas that matter most.
| Switch Type | Safety | Installation | Aesthetics | Cost |
|---|---|---|---|---|
| Air Switch | Excellent | Easy (especially for islands) | Sleek, integrated look | $$ |
| Wall Switch | Fair | Can be complex/messy | Standard, can be intrusive | $ |
| Wireless Switch | Good | Very easy | Clean, no wires | $$ |
| Foot Switch | Good | Moderate | Hidden from view | $$$ |
Ultimately, the best switch is the one that fits your kitchen's layout, your budget, and your tolerance for risk. The air switch, however, consistently hits the sweet spot for safety and modern design.
The Traditional Wall Switch
The good old-fashioned wall switch is the default in many homes. It’s cheap, and any electrician knows how to wire one up without a second thought. But its biggest weakness is safety. We all know electricity and water don't mix, yet we're constantly reaching for that switch with wet hands. It’s a risk we've just gotten used to.
Beyond the safety issue, putting in a new wall switch can be a real headache. It usually means cutting into your drywall to run wires, which adds dust, mess, and cost to your project. And if you have a kitchen island? Forget it. There's no wall to mount it on, making the installation far more complicated.
Modern Wireless and Smart Switches
At the other end of the tech spectrum are wireless switches. These are essentially battery-powered remotes that give you a clean, wire-free look and can be stuck just about anywhere. While that sounds great, they run on batteries that will eventually die, and they can sometimes lose their signal, leaving you with a disposal that won't turn on.
Smart switches are another high-tech option, letting you control your disposal with your voice or phone. If you're building a fully connected kitchen, this can be a neat feature. You can explore this further in our guide on how to incorporate smart technology into your kitchen design.
The decision really boils down to safety and reliability. A wall switch is familiar and a wireless switch offers flexibility, but the air switch gives you a fantastic blend of rock-solid safety and consistent, battery-free performance right where you need it most.
This decision-making guide can help you visualize when an air switch is the most logical choice for your setup.
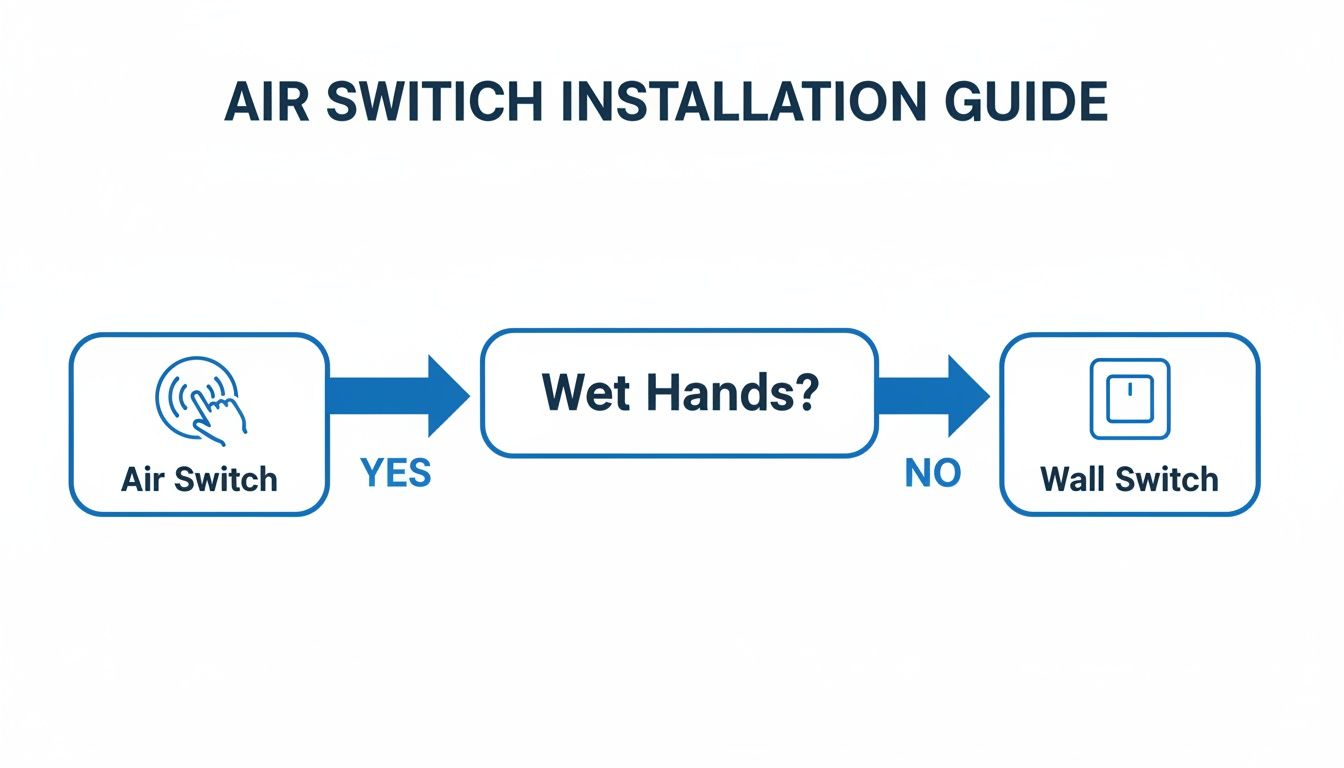
As the chart makes clear, the minute you're dealing with a kitchen island or just want to eliminate the risk of touching a switch with wet hands, the air switch becomes the obvious, safety-first recommendation.
Why the Air Switch Stands Out
The air switch really does hit the perfect sweet spot. It gives you the superior safety of a wireless setup but without the annoying batteries or finicky signals. Its spot on the countertop is super convenient, and the buttons come in all sorts of finishes to perfectly match your faucet and other fixtures.
There's a reason why an estimated 70-80% of new garbage disposal installations in the U.S. now use air switches—they are a simple, effective way to meet modern electrical codes. In fact, these switches are part of a massive global market that helps prevent over 1,000 sink-area electrical injuries in the U.S. every single year. When you choose an air switch, you're not just getting a cool kitchen feature; you're making a real investment in your family's safety.
What Goes Into Installing an Air Switch?
Even though installing a garbage disposal air switch is definitely a job for a pro, knowing the steps involved can be really helpful. It pulls back the curtain on the process, so you can have a much more productive conversation with your remodeling contractor. The whole setup is surprisingly logical, designed from the ground up to keep all the electrical bits safely tucked away under your sink.
The process kicks off with what is arguably the most nerve-wracking part: making a small hole for the push-button on your countertop or sink deck. This isn't a simple job for a standard drill bit, especially when you're dealing with expensive materials like granite, quartz, or marble. Pros use specialized diamond-tipped core bits, often with water cooling, to drill a precise hole without causing any chips or, worse, a massive crack.
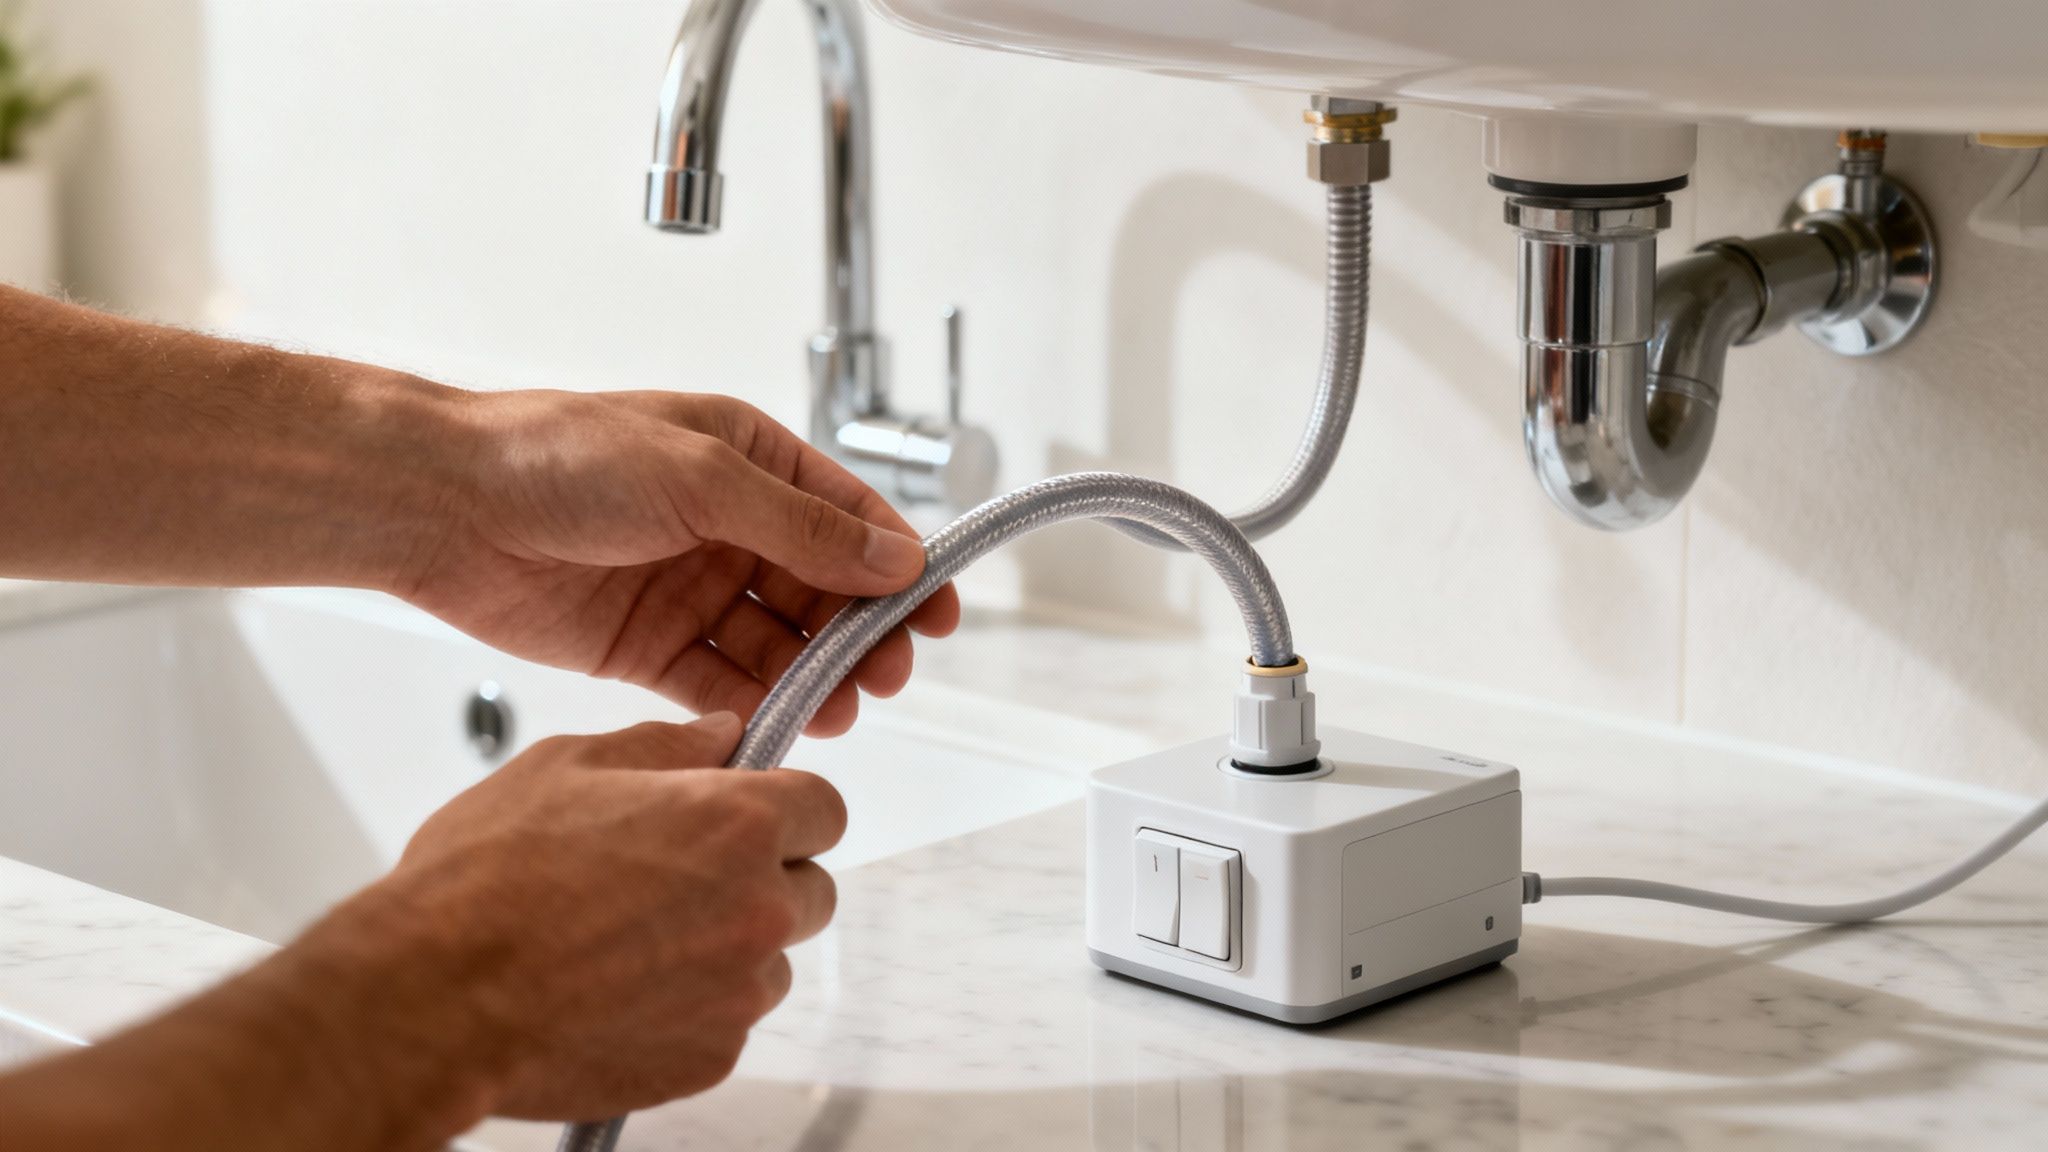
Connecting the Pieces Under the Sink
Once that perfect hole is drilled, the rest of the action happens inside the sink cabinet. This is where you can really appreciate the clever, safety-first design of an air switch.
The hookup is quite simple, really. Here's how it generally plays out:
- Setting the Button: The button you see on the counter gets dropped into the new hole and then tightened from underneath with a nut to hold it firmly in place.
- Attaching the Air Tube: A thin, flexible plastic tube is the key. One end pushes onto a small nozzle on the underside of the button, and the other end connects to the power control box.
- Plugging It All In: This part is just like plugging in a lamp. The garbage disposal’s own power cord plugs into the air switch’s control box. Then, that control box plugs into the wall outlet under your sink—which absolutely must be a GFCI-protected outlet.
That’s it. This straightforward, three-part connection is what makes the system so safe and reliable. If you're curious about the general principles, this guide to wiring a switch safely offers a good overview of the safety precautions involved. A professional will make sure every connection is snug and that the cords are managed properly.
Pro Tip: One of the little things an experienced installer always checks for is kinks in the air tube. That tube needs a clear, smooth path for the puff of air to travel. Any sharp bends or pinches can make the switch unreliable.
The Final Test Run
With everything connected, the last step is to make sure it all works as expected. Your contractor will turn on the faucet, press the button to hear the disposal roar to life, and press it again to make sure it stops immediately. They'll also double-check that there are no drips around the new button and test the GFCI outlet to confirm it's providing the necessary protection.
This careful process ensures your new air switch isn't just a slick, convenient feature but is also installed to be safe and dependable for years to come. By understanding these steps, you can better appreciate the skill your contractor brings to the job, making sure your kitchen upgrade is done right the first time.
Navigating Safety Codes with Professional Installation
An air switch for garbage disposal isn't just about a clean, modern look for your countertop—it's a serious safety upgrade designed to meet today's strict electrical codes. Think about it: the area around your kitchen sink is a designated wet zone, and building codes don't mess around when it comes to mixing water and electricity. The number one priority is preventing electrical shock, and this is where the air switch really proves its worth.
The magic is in its design. The button you press on the counter has no electrical components at all. Pushing it sends a puff of air through a tube, which flips a switch in a power module safely tucked away under your sink. This creates a literal air gap between your wet hands and the live electrical circuit. It’s a brilliantly simple solution that makes it impossible for electricity to find a path to you, which is why it's a go-to for installers, especially on kitchen islands where a wall switch is often out of the question.
The Role of GFCI Outlets
Of course, the air switch doesn't go it alone. It’s one piece of a complete safety puzzle. The power control unit for the air switch must be plugged into a Ground Fault Circuit Interrupter (GFCI) outlet under the sink. A GFCI is like a hypersensitive bodyguard for your electrical system.
It constantly monitors the electrical current flowing through it. If it senses even the slightest fluctuation—the kind that might happen if electricity were to pass through water or, worse, a person—it snaps the power off in a millisecond. This combination is a one-two punch for safety:
- The Air Switch: Your first line of defense, keeping electrical current far away from the button you actually touch.
- The GFCI Outlet: Your essential backup, standing by to kill the power instantly if any electrical fault ever occurs.
This two-part safety system is the gold standard for operating a garbage disposal safely. The air switch prevents direct contact with electricity, while the GFCI acts as a fail-safe, making your kitchen a much safer place for everyone.
Why Professional Installation Matters
While the concept behind an air switch is straightforward, getting the installation right is absolutely critical for both safety and meeting local codes. Electrical codes can be surprisingly specific from one town to the next, and a licensed contractor will know exactly what’s required. They’ll make sure the GFCI is wired correctly and that every connection is tight and secure.
Hiring a pro is also about protecting your investment. One wrong move while drilling a hole in a beautiful granite or quartz countertop can lead to an expensive, heartbreaking crack. It’s a job best left to someone with the right tools and experience.
If you’re leaning toward professional installation, knowing how to find the right person is key. For a deep dive, check out our guide on how to choose a kitchen remodeling contractor. Additionally, understanding the nuances of hiring kitchen remodeling contractors can save you a lot of headaches. An experienced professional will get the job done right the first time, giving you peace of mind that your new switch is safe, up to code, and perfectly installed.
Troubleshooting Common Air Switch Issues
Even the most dependable gadgets can have an off day, and your air switch for garbage disposal is no different. The good news? Most of the common hiccups are surprisingly easy to diagnose and fix on your own, no professional needed.
Before you dive in, let’s get the most important rule out of the way: never stick your hand down the garbage disposal. For any work involving the disposal chamber itself, unplug the entire unit from the air switch power module first. Safety always comes first.
Disposal Does Not Turn On
You push the button and… nothing. Don't worry, it's rarely a sign of a major failure. More often than not, it's a simple power issue or a connection that's wiggled loose. A quick, systematic check usually gets things running again in minutes.
Let's start with the easy stuff.
- Check the GFCI Outlet: Find the outlet under your sink where the air switch is plugged in. See that little "reset" button? If it's popped out, push it back in firmly until you hear a click. GFCIs are designed to trip, and this is the most common culprit.
- Verify All Connections: It sounds obvious, but you’d be surprised how often a plug isn't seated properly. Make sure the disposal is plugged tightly into the air switch's power module, and that the module itself is plugged securely into the wall.
- Inspect the Air Tube: That thin plastic hose is the lifeline. Check that it's snugly attached at both ends—one to the button on your countertop and the other to the power module below. If it's loose, the puff of air can't do its job.
Button Feels Stuck or Disposal Is Unresponsive
What if the button feels stiff, mushy, or just doesn’t seem to do anything? This usually points to a mechanical issue, not an electrical one. Think of it like a blocked straw; something is getting in the way of the air pressure signal.
Think of the air tube as the system's nerve. If it's blocked, pinched, or disconnected, the signal from the button simply can't reach the power module to tell it what to do.
First, trace the air tube from the button to the module. Look for any sharp bends or kinks that might be choking off the airflow and gently straighten them out. You can also try disconnecting the tube from the button and blowing through it to clear any small bits of debris. If the button itself is sticky, just wiping around its base with a damp cloth can often get it moving freely again.
Budgeting for Your Air Switch Upgrade
So, how much is this upgrade going to set you back? When you're thinking about adding an air switch for your garbage disposal, the total cost really breaks down into two parts: the switch kit itself and the labor to get it installed professionally.
Let's start with the hardware. The good news is, the air switch kit itself is pretty affordable. You can find basic kits in simple finishes like polished chrome for as little as $30 to $50. If you're aiming for a more custom look to match your faucet, expect to spend a bit more—somewhere between $60 and $100 for finishes like matte black, brushed nickel, or oil-rubbed bronze.
Factoring in Professional Installation Costs
While the kit won't break the bank, hiring a pro is where you'll see the bigger part of the investment. You can generally expect a licensed plumber or contractor to charge between $150 and $300 for the installation.
What makes that price fluctuate? A few things come into play:
- Your Countertop Material: Cutting a hole in laminate is a piece of cake. But if you have granite, quartz, or marble, that's a different story. It requires special diamond-tipped bits and a steady, experienced hand to avoid cracking your beautiful countertop, which naturally adds to the labor cost.
- Your Existing Setup: If you're lucky enough to have an unused hole from an old soap dispenser or sprayer, the job gets a lot simpler and cheaper. If a new hole needs to be drilled, that's what will take up most of the installer's time.
- Local Labor Rates: Costs for skilled labor can vary quite a bit from one city to another, so it’s always a good idea to get a couple of quotes from local pros.
A professional installation isn't just about making the switch work. It's about protecting your expensive countertop from getting chipped or cracked, ensuring the electrical connections are safely wired to a GFCI outlet, and making sure everything is up to local code.
When you're ready to hire someone, make sure they are licensed and insured. Don't be shy about asking to see photos of similar jobs they've done, especially if they'll be drilling into your counters. Doing a little homework upfront ensures you get someone who will do the job right the first time.
And if you're looking for more ways to keep your project on budget, check out these money-saving tips for a smart kitchen renovation.
Common Air Switch Questions
Even after you've got the basics down, you might still have a few questions about installing an air switch for your garbage disposal. That's perfectly normal. Let's tackle some of the most frequent ones we hear from homeowners.
Getting clear, straightforward answers is the best way to decide if this handy little device is the right call for your kitchen project.
Can I Put an Air Switch on Any Type of Countertop?
Pretty much, yes. Whether you have granite, quartz, laminate, or even a stainless steel countertop, an air switch can be installed. The real challenge comes with drilling into those harder materials like stone or quartz.
You'll need special diamond-tipped drill bits and a steady hand to avoid cracking or chipping your beautiful countertop. This is exactly why we almost always recommend letting an experienced contractor handle it—it's just not worth the risk to your investment.
Does an Air Switch Use Batteries?
Nope, not a single one. An air switch is a surprisingly simple mechanical device that works on a puff of air.
When you press the button, it sends a burst of air through a thin plastic tube. This tube connects to a power control box under your sink, which is plugged into the wall outlet. That little air pulse is what flips the switch inside the box to turn your disposal on or off. All the electricity stays safely tucked away below the sink.
One of the best things about an air switch is its battery-free design. You never have to worry about dead batteries or the signal issues that can sometimes plague wireless models. It's just simple, reliable, and always ready to go.
Are There Different Finishes Available for Air Switches?
Absolutely. You can find an air switch button to match just about any kitchen decor. They come in a whole host of finishes to perfectly complement your faucet and other hardware.
You’ll easily find popular styles like polished chrome, brushed nickel, oil-rubbed bronze, and a sleek matte black. This makes it incredibly easy to blend the switch into your kitchen's overall design for a clean, professional look.
Ready to add the safety and convenience of an air switch to your kitchen? The pros at Kitchen Renovations Perfected can manage the whole job for you, from carefully drilling the countertop to making the final electrical connections. We'll make sure the result is flawless. Visit us at https://www.kitchenrenovationsperfected.com to book your free consultation today.