Before you can even think about organizing your closet shelves, you have to get real about what's on them. The first step isn't buying cute baskets—it's clearing everything out. This foundational work ensures you're only making space for things you actually use and that every container you bring in fits like a glove.
Your Starting Point for Perfectly Organized Shelves
Staring at a jumbled mess of clothes, boxes, and long-forgotten items can feel completely overwhelming. The secret to tackling it isn't just tidying; it's a full-on strategic reset. To get that clean, organized look you're after, you need to create a blank slate. That means pulling every single thing off those shelves. Yes, everything.
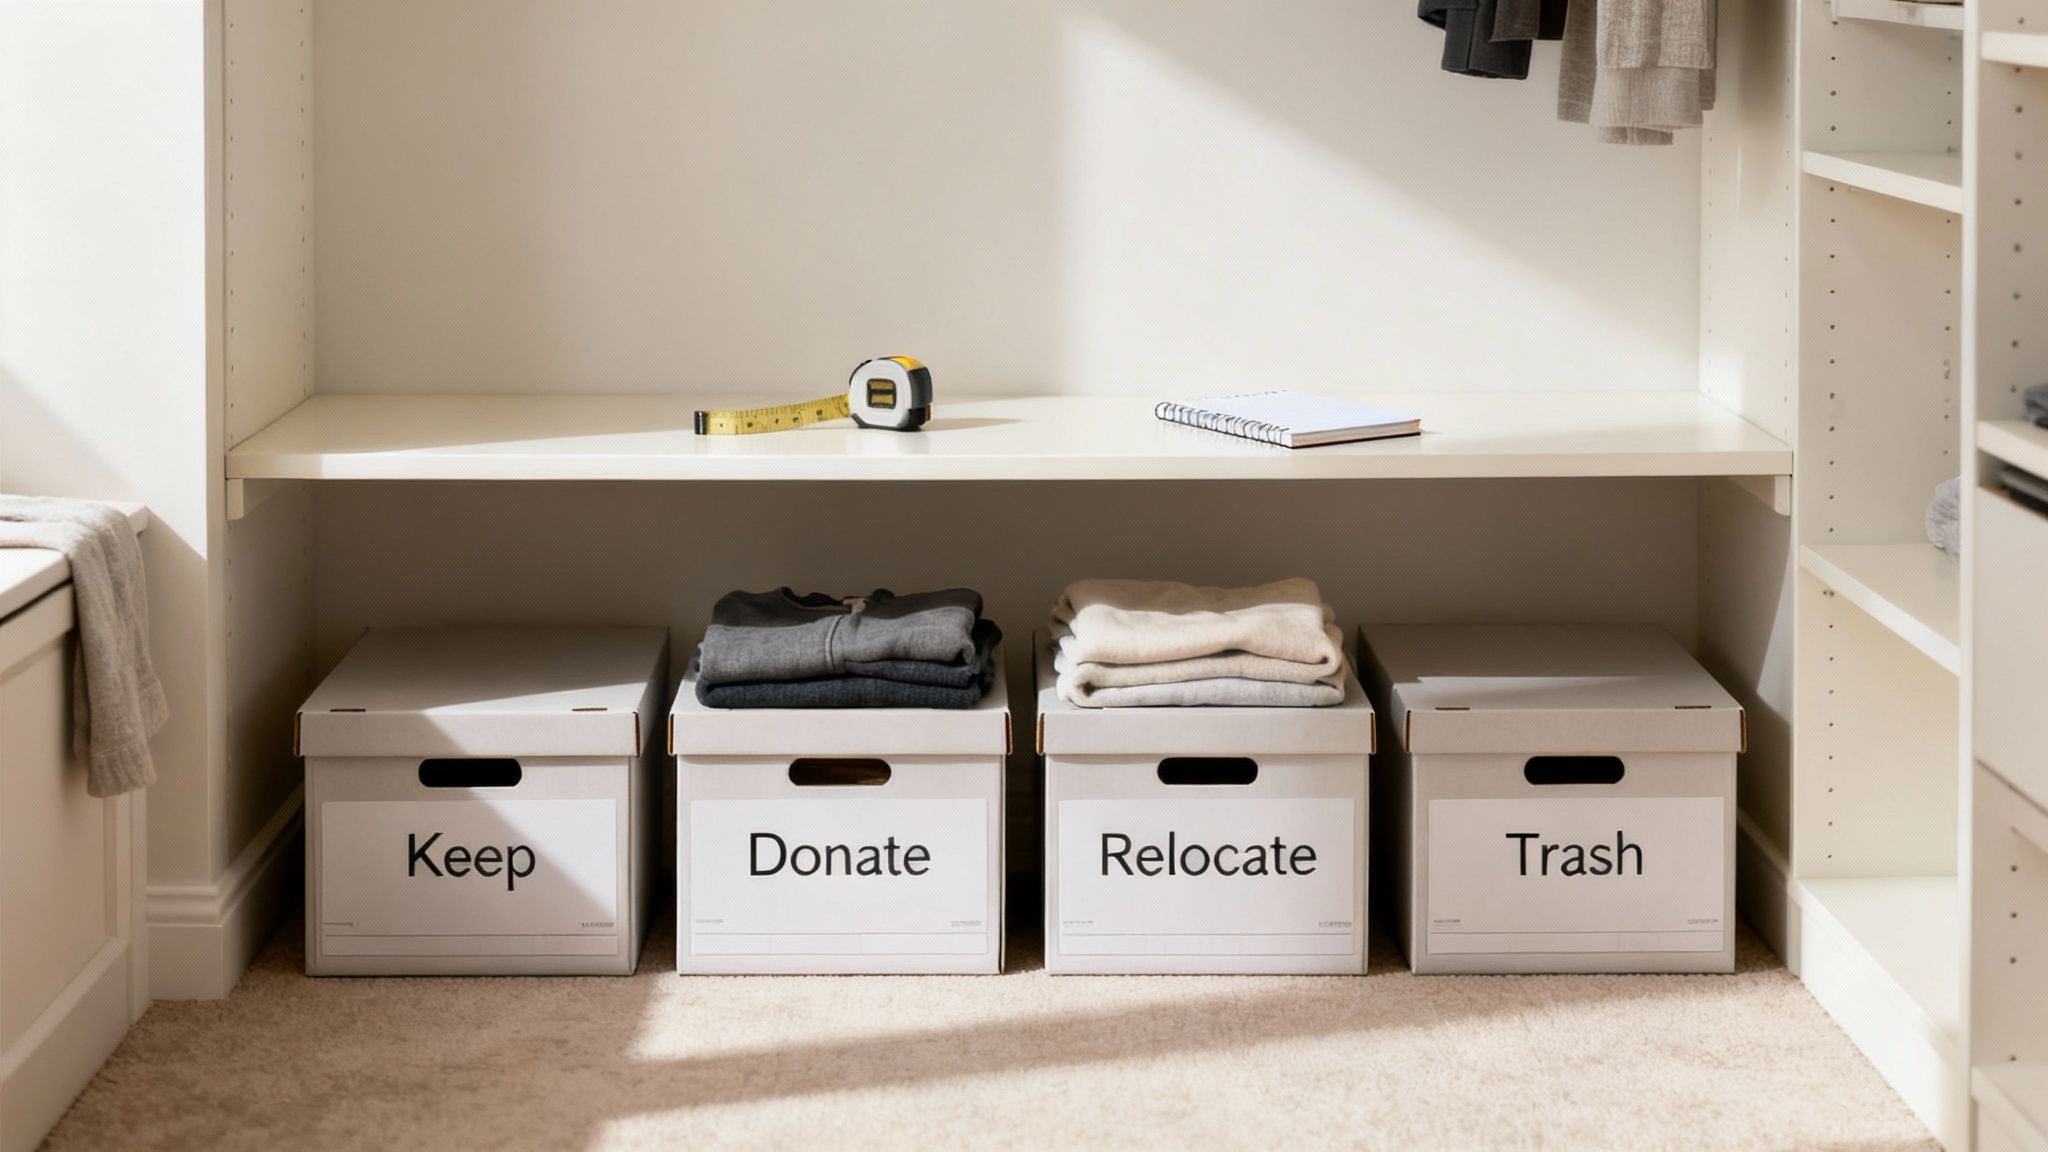
This initial clean-out is, without a doubt, the most important part of the entire process. As you take things out, sort them immediately using what I like to call the "four-box method." Be ruthless. If you haven't worn it in a year, if it doesn't fit, or if it just doesn't feel like you anymore, it's time for it to go.
Here's a quick breakdown of how to sort your items for a truly effective decluttering session.
The Four-Box Decluttering Method
| Category | Action | Examples |
|---|---|---|
| Keep | Items to put back in the closet | Clothes you love and wear regularly, in-season accessories, cherished keepsakes. |
| Donate | Good-condition items you no longer need | Unworn clothing with tags, outgrown shoes, purses that are gathering dust. |
| Relocate | Items that don't belong in this closet | Books, out-of-season holiday decor, paperwork, your kid's lost toys. |
| Trash/Recycle | Items that are broken or unusable | Stained t-shirts, single socks, broken hangers, expired products. |
This method forces you to make a decision on every single item, which is the key to reclaiming your shelf space for good.
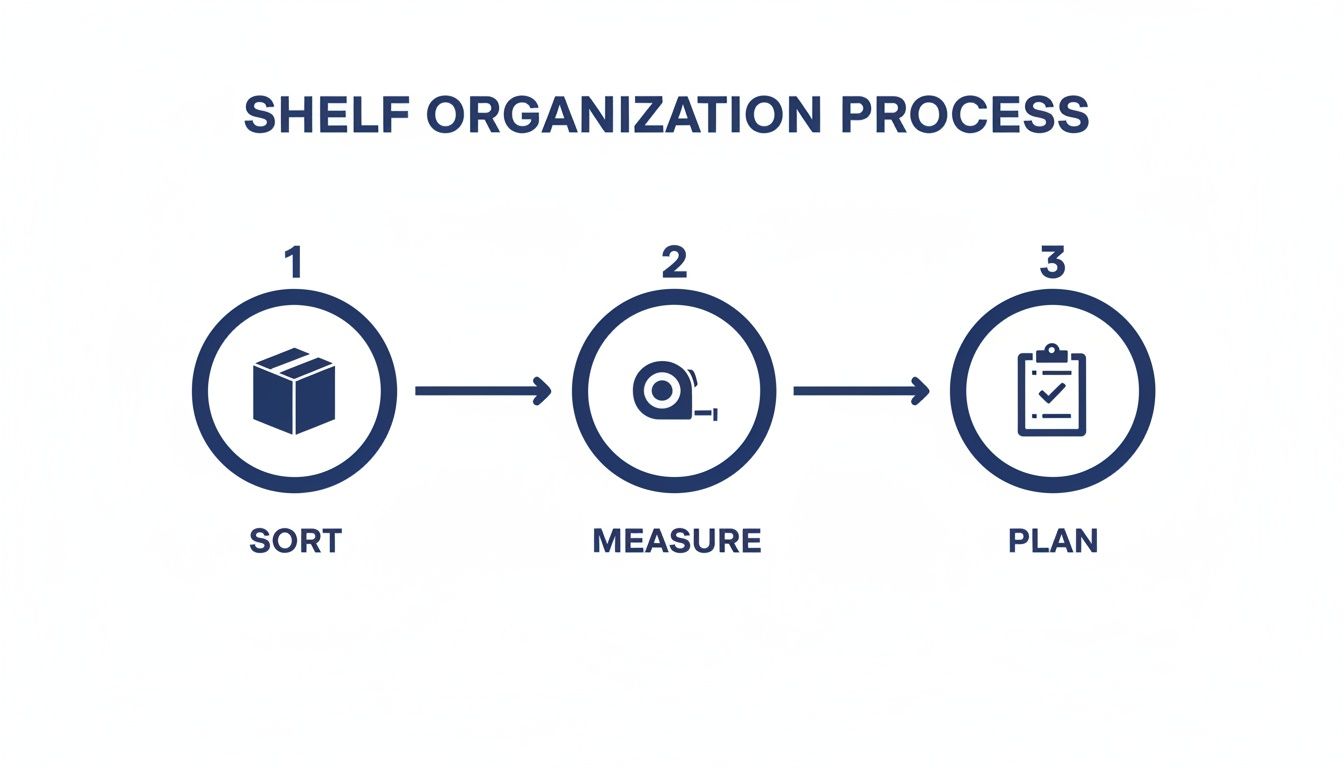
This whole process can be boiled down to three simple, logical steps: Sort, Measure, and Plan.
Thinking about it this way keeps you from making the number one mistake: buying storage containers before you know what you need to store.
Measure Twice, Organize Once
Okay, your shelves are empty and you've conquered the clutter. Now, grab a tape measure. This simple action is what separates a frustrating, haphazard setup from a perfectly optimized one. Don't eyeball it—get the exact dimensions.
- Shelf Depth: Measure from the back wall to the front edge of the shelf. This tells you the maximum depth for any bin or basket.
- Shelf Width: Go from one side to the other. This helps you figure out if you can fit two, three, or even four small containers side-by-side.
- Vertical Height: Check the distance between each shelf. This is a critical measurement that people often forget, leading them to buy bins that are just a fraction of an inch too tall.
Taking a few minutes to do this saves you from the headache of returning containers that just don't work. For instance, if you know your shelf is 14 inches deep, you can shop confidently for bins that are 13 inches deep, leaving that crucial bit of wiggle room to grab them easily.
A truly effective organization strategy always starts with a ruthless declutter. Studies have shown that most people only wear 20% of their clothes 80% of the time. Clearing out the other 80% is the single fastest way to instantly create more space.
If you find that your current shelf layout just isn't cutting it, no matter how much you declutter, it might be time to think bigger. For those planning a more significant closet overhaul, exploring custom solutions from a dedicated closet division can provide inspiration and professional guidance on maximizing every inch of your space.
Designing Shelf Zones for Daily Efficiency
Now that your shelves are clear and you've got your measurements, it's time for the fun part: smart design. This is where we move beyond simple tidying. The key to truly functional closet shelves is to stop seeing them as random flat surfaces and start thinking of them as strategic zones.
This concept, called zoning, is all about assigning a purpose to each shelf based on how often you actually need what's on it.
Think of it like this: your closet should be a map of your daily routine. The shelves that are easiest to see and reach—your "prime real estate"—should hold the things you grab most often. This one mental shift can turn a chaotic closet from a source of stress into a tool that makes your morning routine smoother. It's about making the space work for you.
Map Your Closet Zones
Before you put a single thing back, take a moment to mentally divide your shelving into three core zones. This simple framework is the foundation for a closet that feels intuitive and just plain works.
-
Prime Real Estate (Eye Level): This is the sweet spot, right between your waist and just above your eyes. These shelves are for your daily drivers—the folded sweaters you live in, your go-to t-shirts, and everyday jeans. No more stretching or bending for the stuff you wear constantly.
-
Top Shelf Territory (High Storage): The top shelf is your best friend for things you don’t need every day. Think seasonal items like bulky winter coats, that hat you wear for special occasions, or sentimental keepsakes. Getting them up and out of the way frees up precious, easy-to-reach space for your current rotation.
-
Lower Level Storage (Bottom Shelves): Use the lowest shelves for anything heavy or bulky. This is the perfect spot for shoes, boots, luggage, or even bins filled with workout gear. Placing heavier items down low is not only safer but also makes them much easier to slide out when you need them.
This tiered system is a fundamental principle professional organizers swear by. In my experience, households that adopt this simple zoning strategy often find they spend up to 50% less time just looking for their clothes each morning.
Personalize Your Shelf Layout
Here’s where the real magic happens. You need to customize these zones for your life, not some generic ideal. Don't just follow a template; think about how you actually live and get dressed.
For example, if you work from home and practically live in athleisure, why not create a dedicated “activewear” zone right at eye level? Or if you have a collection of handbags you love, give them a prime spot on a mid-level shelf where you can see them all and easily swap them out.
Pro Tip: Try thinking in "activity clusters." I often advise clients to store their weekend casual wear next to their gym clothes if they typically hit the gym on Saturdays. This kind of logical grouping just makes sense and cuts down on the mental effort of getting ready.
Ultimately, designing your shelf zones is about creating a system that feels completely natural to you. If you're tackling a bigger project, these same principles apply on a larger scale. For anyone considering a full renovation, our guide on how to design a walk-in closet dives deeper into how zoning can transform a larger space. By tailoring your shelves to your real-life habits, you’ll build a closet that genuinely simplifies your day.
Get the Right Gear: Bins, Baskets, and Dividers
Okay, so you’ve zoned your closet. Now for the fun part—and the secret to making it all stick. Simply stacking things on a shelf is a recipe for a slow-motion avalanche. The real magic comes from using the right bins, baskets, and dividers to give everything a proper home. This is how you go from temporary tidiness to a lasting, functional system.
Choosing the right container is about more than just aesthetics. It’s a strategic move to match the container's purpose to what you're storing and where it lives. The idea is to cut down on visual noise and make finding—and putting away—your stuff completely effortless.

Match the Container to Its Contents
The type of storage you pick needs to make sense for what’s going inside it. Putting delicate sweaters in a rough wicker basket or tiny accessories in a deep, dark bin just creates a new kind of chaos. A little thought here will save you a ton of frustration later.
- Clear Bins for Grab-and-Go: For things you need to see at a glance—think craft supplies, kids' toys, or even your collection of workout tops—clear plastic or acrylic bins are your best friend. No more guessing what’s inside.
- Fabric Baskets for a Softer Touch: Items like scarves, linens, or even rolled t-shirts sit beautifully in fabric baskets. They add a bit of texture and warmth to the closet while preventing snags on delicate fabrics.
- Woven Baskets for the Heavy Lifters: Got bulky sweaters, extra throw blankets, or a collection of tote bags? Sturdy woven baskets made of hyacinth or rattan are perfect. Their structure is ideal for heavier items, especially on lower shelves.
- Lidded Boxes for Deep Storage: Anything heading to that top shelf for the long haul (seasonal decor, old photo albums) needs a lid. Lidded boxes protect from dust and create a clean, uniform line across the top of your closet.
My rule of thumb is simple: if you use it often, you need to see it easily. Open-front bins or clear containers remove any barrier between you and your daily essentials, which is key to preventing future messes.
Bring Order to Your Stacks with Dividers
Let's be honest, not everything needs to go in a bin. Items like sweaters and jeans are often best stacked right on the shelf. The problem? Those stacks love to lean, tumble, and merge into one giant pile. This is where shelf dividers become your secret weapon.
These are simple acrylic or metal brackets that just slide or clip onto your shelf, instantly creating vertical supports. It's the pro-organizer trick for taming wobbly stacks. Instead of one precarious tower of sweaters, you get several neat, manageable columns that stay put.
This simple tool works wonders for:
- Stopping the Topple: They keep your neat piles of jeans and sweaters from falling over.
- Creating Visual Categories: You can easily separate your V-necks from your crewnecks on the very same shelf.
- Upright Handbag Storage: Dividers are fantastic for propping up clutches and smaller purses so you can see your whole collection at once.
By combining the right bins to contain loose items and the right dividers to structure your stacks, you’re building a system where everything has a clear, logical place. It’s a game-changer that not only looks incredible but makes it second nature to grab what you need and, more importantly, put it right back.
Getting the Most Out of Your Vertical Space and Shelf Placement
When it comes to closet organization, the biggest mistake I see people make is only thinking horizontally. We often forget to look up! Most closets have a ton of wasted vertical space just begging to be used. Learning to see and claim that space is what separates a cramped, frustrating closet from one that feels airy and actually works.
It’s all about being smart with where your shelves are and not being afraid to add new ones. Don't just settle for that single builder-grade shelf and rod combo. That empty void above your hanging clothes? That's prime real estate for off-season storage or things you don't need every day.

Smart Shelf Spacing
The height between your shelves makes all the difference. If they’re too far apart, you’ll end up with those leaning towers of sweaters that are bound to fall over. Too close, and you can’t fit anything useful.
From my experience, the sweet spot for folded items like jeans, sweaters, and t-shirts is about 12 to 14 inches of vertical space. This gives you enough room for a decent-sized stack without it becoming unstable. Professional organizers love this standard because it can help you fit up to 80% more folded clothing compared to a closet that only has hanging rods.
Pro Tip: When you're stacking sweaters or other bulky items, I always recommend the "rule of six." Never go higher than six items in one pile. Any more than that and the whole stack becomes a game of Jenga—try to pull one from the bottom, and you'll cause a total closet avalanche.
Add Storage Without a Drill
I get it—not everyone wants to (or can) start installing permanent shelves. If you're renting or just aren't ready for a DIY project, there are some fantastic, damage-free ways to add more storage surfaces to your closet.
These little additions can honestly double your usable shelf space overnight:
- Tension Shelves: These are brilliant. They adjust to fit between two walls and use tension to stay in place—no screws needed. They’re perfect for adding a new shelf in that empty gap above your existing top shelf.
- Under-Shelf Baskets: These wire baskets are a game-changer. They just slide right onto an existing shelf, creating a little cubby underneath for small things like scarves, clutches, belts, or socks.
- Stackable Shelf Inserts: These are basically small, freestanding shelves you can pop onto a deeper shelf to divide the space. Instead of one tall, messy pile, you get two short, neat stacks.
Of course, if you're thinking about a more permanent upgrade, looking into some custom closet design ideas can show you how built-in features can completely transform a closet. But for a quick win, using these simple tools is the best way to conquer those vertical dead zones and make every single inch count.
Building a Maintenance Routine That Actually Sticks
Alright, your closet shelves look fantastic. The real trick, though? Keeping them that way. Let’s be honest, an organized closet isn't a one-and-done project; it’s about building new habits. The goal is to create simple routines that stop clutter from creeping back in and ruining all your hard work. This isn’t about being perfect—it's about small, consistent actions that eventually become second nature.
Think of it like basic "closet hygiene." You brush your teeth every day, right? A quick closet reset can feel just as automatic. By putting these simple systems in place now, the effort you've already invested will pay off for years to come, leaving you with a space that feels functional and calm.
Adopt the One-In, One-Out Rule
If I could give you only one piece of advice for preventing future clutter, it would be this: the one-in, one-out rule. It's brilliantly simple. Every time you bring a new piece of clothing into your closet, a similar item has to leave. Just bought a new sweater? Great. It’s time to donate an old one. Snagged a new pair of jeans? Say farewell to that pair you haven’t worn in a year.
This simple swap forces you to be more intentional about your wardrobe and puts a hard cap on how much stuff can accumulate. It single-handedly stops your closet from becoming overstuffed and makes you think twice before making a new purchase. For long-term organization, this habit is a total game-changer.
My favorite pro tip is to keep a donation bin or a simple tote bag right in the closet. The moment you decide an item is on its way out, toss it in there. No more letting it hang around on a shelf for weeks.
Schedule a 10-Minute Weekly Reset
When it comes to staying organized, consistency will always beat intensity. You don't need to block out an entire afternoon for a massive overhaul every month. What you really need is a quick weekly touch-up. I recommend setting aside just 10 minutes—that’s it!—every Sunday evening to give your shelves a quick reset.
During this little tidy-up, you’re just hitting the highlights:
- Fix the folds: Straighten out any piles of sweaters or t-shirts that have started to look a bit sloppy.
- Put things back: That belt you tossed on the shelf? Put it back in its bin. The shoes you kicked off? Return them to their spot.
- A quick zone check: Glance over everything and make sure your daily-use items are still front and center and everything is in its proper home.
This tiny investment of time is what stops a few misplaced items from snowballing into total chaos. It's the secret sauce that makes an organization system last for more than a few weeks. A quick reset keeps you on track and makes it incredibly easy to maintain the order you worked so hard to create.
Common Questions About Organizing Closet Shelves
Even with a solid game plan, you're bound to run into a few tricky spots when you’re organizing your closet shelves. That's perfectly normal. Let's walk through some of the most common questions I hear all the time.
Think of this as your troubleshooting guide—quick, practical answers to help you get past those little hurdles and perfect your new system.
What Should I Do with Bulky Items Like Sweaters or Hoodies?
This is the classic closet conundrum. Your gut instinct might tell you to hang up those big, cozy sweaters, but that can be a real mistake. Most hangers will stretch out the shoulders, leaving permanent, lumpy bumps in the fabric of your favorite knits.
For this reason, bulky items almost always belong on a shelf. The key is to fold them neatly. To keep those stacks from tumbling over, I highly recommend using shelf dividers. They create perfect, contained columns about 10-12 inches wide.
If your bulkiest hoodies are still hogging too much prime real estate, think about moving them to under-bed storage bins. That frees up valuable shelf space for clothes you reach for every day.
My favorite trick for sweaters is the "file fold." Instead of stacking them flat, I fold them and stand them up vertically in a drawer or a deep bin. You can see every single sweater at a glance, like files in a cabinet. Nothing gets lost at the bottom of the pile ever again.
How Can I Organize Awkwardly Shaped Items Like Purses?
Handbags, clutches, and totes are notorious for turning a neat shelf into a jumbled mess. The best strategy here is to give each one its own designated, upright spot. This prevents them from getting crushed, misshapen, or lost in a pile.
Here are a few methods that have worked wonders for my clients:
- Use Dividers: Clear acrylic shelf dividers are fantastic for propping up clutches and smaller bags in a neat, tidy row.
- Create Cubbies: If you have deep shelves, a simple cubby organizer can be a game-changer. Assign one small handbag to each cubby for that clean, boutique look.
- Store Bags in Bins: For softer totes or out-of-season bags, an open-front bin is perfect. You can see what’s inside and grab what you need without unstacking anything.
- Hang the Big Ones: Don't forget the closet rod! Large, sturdy tote bags with strong straps can often be hung from S-hooks, getting them off your shelves entirely.
Is It Better to Use Open Bins or Lidded Boxes?
This really comes down to two things: where the container is going and how often you need to get inside it. I tell people to follow a simple rule of thumb that makes the decision easy.
It’s all about access versus protection.
| Storage Type | Best For | Why It Works |
|---|---|---|
| Open Bins | Frequently used items like socks, scarves, t-shirts, or workout clothes. | They offer grab-and-go convenience with no lid to fuss with. Perfect for shelves at or below eye level. |
| Lidded Boxes | Long-term or seasonal storage like off-season sweaters, keepsakes, or hats. | The lids protect everything from dust and create a neat, stackable surface. Ideal for high top shelves or down low on the floor. |
In the end, the most functional closets almost always use a mix of both. Keep your high-traffic items in open bins for easy daily access, and use lidded boxes to protect and store everything else. That combination is really the key to an efficient and practical closet.
Feeling like your closet needs more than just a few new bins? If you’re dreaming of a truly customized space with smart shelving and intuitive design, the team at Kitchen Renovations Perfected can help. We design and build custom closets that transform your space from cluttered to calm. Learn more about our custom solutions by visiting us at https://www.kitchenrenovationsperfected.com.